Well at this point I thought I would be laying out and rigging the plants for the missile fly by scene as well as the particles for the missile trail and then doing the texture for Bap, but there were some problems that simon needed me to fix on the hunter so I put the fly by scene on hold and picked up the hunter and started my fixing.
The first problem that I encountered was what me and matt l described as a T5000 like spear which seemed to be coming out of the hunters right arm. I was quite familier with this kind of problem from when I was weighting Bap. It occurs when verticies have no weights assigned to them. Below shows the first of many problems I encountered with the rig.
A few clicks here a few clicks there and the problem was solved, well I pritty much re-weighted both hands properly to be safe, making sure each joint deformed as it would on a real hand using my own hand as reference was particulary useful.
After the T5000 issue had been fixed there was a few other issues that simon asked me to fix so I got to it. The first of which being the neck weighting when the hunter rotates his neck the collar would go through the coat. To fix this I started by weighting the collar to follow the neck joint correctly. I then secondly started weighting the coat easing the strength of the weighting in but only to a value that would subtly effect the coats geometry and so that the collar would not pass through the coat. I was able to account for this up to about a 45% rotation but any further and the collar would pass through. This could not be fixed easily without re-topologizing the collar and coat top to allow for better deformations. As we didn't have time for this we just left it at a compromise of sacraficed rotation for the hunters neck which wasn't a massive problem as he wasn't really doing any 90% turns with his head like a owl so that was ok.
The next problem was his coat around his gluteus maximus, his trowser's kept coming through his coat and his groyne had very weird and dodgy deformation. With a bit of prancing around the studio raising my legs unnecessarily high, to get a feel for what muscles and clothing are influenced by the various joints of the body I managed to iron out the kinks.
Below shows the lower coat and groyne fix and well as a quick look back at the re weighting of the fingers.
The last real fix I had to do was weighting the feet which for some reason kept messing up when the animators got hold of it, but the second attempt seemed to iron out all the problems. Below shows the breakdown of the weighting for the lower leg joints.
After all the fixes had been done simon asked me if the mostache of the hunter could be rigging so to stop it going through his face during facial animation. I did this portion of rigging between starting the texturing of bap and building the missile fly by scene so its kind of a pre emptive post so to keep all the hunter rigging and fixes in one post.
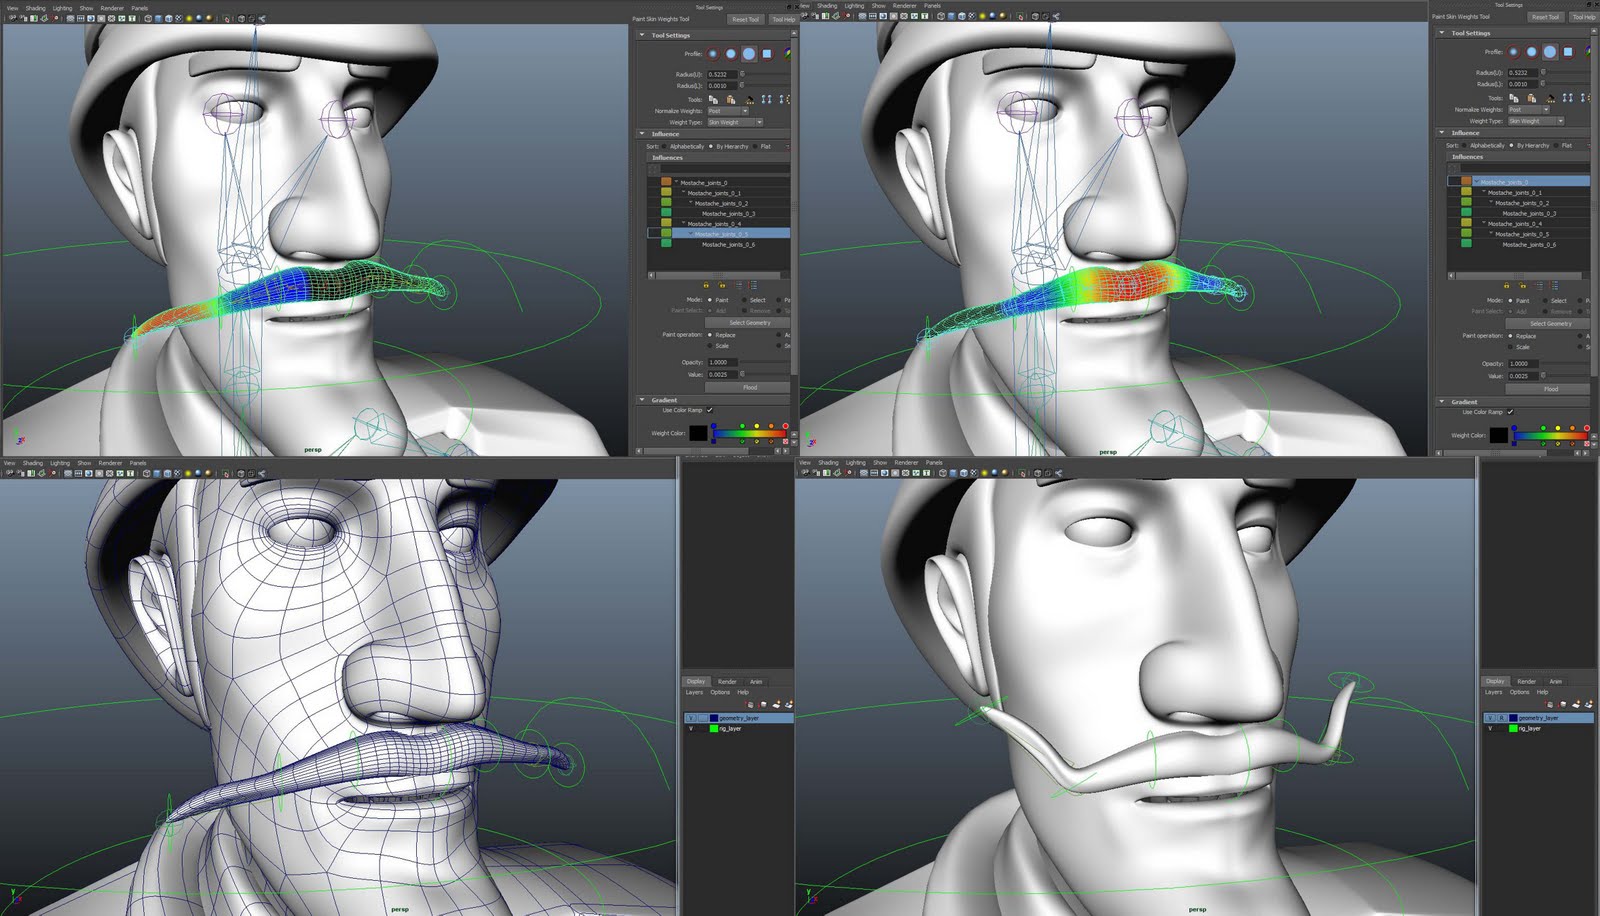
For this I just made a basic fk control system attached to the main rig neck joint so when the head rotates the mostache would follow correctly and could also easily be animated by the simple fk controls see above.
In the next post Il cover Baps texturing and the start of the infamous missile fly by scene.
Tuesday, 5 April 2011
Monday, 28 March 2011
Missile Jungle scene:Fire zzz missiles.
Ok so this scene out of all the scenes was the most undecided in terms of layout and shot positioning. So me and simon had a quick sit down and went over how he wanted it to be set up. The majority of the distant background in this would be matte paintings or planes of plants by simon to save on render time as the scene needed to feel very spacious and the plants close to shot would be plants that Id modelled and a few of simons. Now that I had a bit of practice at laying out the scenes in a organic way rather than as a vegetable patch, things went a lot smoother. Below are a few breakdowns of the scenes from various initial shots composed by simon and a few personal angles I liked. The scene is still work in progress and the plants where only layed out according to the rough cameras that I had been given.
Once this scene had been roughly layed out until we got some more cameras I started finalizing the key props, such as the missile, missile crate, pocketwatch, missile controller, hunters gun and hunters sword.

The hunters gun I didn't have time to texture so simon textured that. I will probably texture it myself at a layer date for my own portfolio. The sword ended up not being used so only got as far as modelling and uv'ing which took one evening in total so wasn't a massive loss. The main problems overall was the lack of time and my lack of texturing experience, these where the first props I started texturing on the project, before the camp scene props. I didnt have much time to practice as I needed to get them out the way so I could move on to making the missile fly by scene. For the time and experience I had I was happy with my first few textures, first being the missile.
The model and wireframes of the gun and sword which will be textured for the portfolio when I get time.
In the next post I will cover the missile fly by scene which I will be laying out and rigging the plants for it and making the missile particle trail according to the camera shot which has been established by simon. Before that I may also have some rigging fixes that needed to be done to the hunter and weight painting fixes.
Thursday, 24 February 2011
Gun hunt scene: Nothing like a bit of gardening.
For the gun hunt scene I once again had a proxy scene to work from rather than concept art which didnt bother me to much as I could lay things out as I saw fit. I also used the animatic as reference for shots until oddne passed over his cameras to me that he had layed out during his block through as better reference for where to put plants to best optimise space. Here are a few shots with basic lighting that I did so you can see how things started to get roughed out.
The lighting was only very rough, just to show how the larger trees shadows would block areas out and to get a rough idea of how the various plants would fill out the background. The bottom right image for example has bad lighting but it helps show how the bamboo plants frame the hunters silouette nicely.
There were a few plants and trees that had to have there uv's and goemetry touched up form the camp scene and some more plants were added at this stage mainly the bamboo with 5 variations of the textures by Emma Taylor, there was also a few more plants added at this point by Simon Acty. Below shows a few I added in and Emma textured in the following breakdowns. These didn't get fully finished during the camp scene but were added in later once finished.
For the part in the scene when the hunter peers through the bushes at bap sitting under the mushroom tree on his rock, I had to rig up the bamboo plants. I rigging them up with a simple single chain of bones driven by set driven keys in a 2 way rotation. I used this to position the plants in various poses, then deleting the rigs of the ones I didn't need for the opening where the hunter peers through. For where the hunter peers through I split the remaining bamboo's with rigs into two groups so each group would fan out when the hunter moves them with his hand. Below shows a quick demo of the bamboos range of movement in 1 of the 2 axis's.
There was still plenty to be textured and bits and bobs to be modelled in this scene at this stage but time was short and I had to move on to populating the last scene of mine, the missile scene which was the most undecided scene design wise at this point so I had to get on with it. If I had more time to work on this scene I would have liked to add more detail in and more natural features other than plants, like wreckage and dead foliage ect. To round off here are 2 breakdowns of the modelling and layout by me and texturing by Emma Taylor.
Also here is a little lighting test of 1 of the initial gunhunt scene shots after Olly Skillman Wilson got his hands on my scene to play with some lighting. I felt much better once I saw some lighting in the jungle about how I had layed the scene out. It gave it so much more life and a greater sence of space, See below.
Friday, 18 February 2011
Camp scene: Where the wind blows.
OK so in the following post im going to show the dynamic wind I created for the tent and the flag and mooring line. In the first video here I set up the 2 tent door pieces as ncloth and transform constrained the edges round the outside boarder. This enabled the tent door geometry to act like ncloth and drape down but remain attached to the rest of the geometry like a tent door would. I then made a trusty (donno inspired) red cube companion to simulate the apprentice opening the tent door and emerging just as a test and made it a passive collider. This was done so that when the cube emerged, the tent door ncloth would deform and move out the way, simulating how a tent door would open. Obviously this is to test and refine a nice deformation of the door through adjusting the nucleus properties. After testing different settings with the nucleus and some refined adjustments i managed to get the cloth to deform fairly nice for the first day see below.
In the second video I seperated the flag and tents main canvas onto a seperate nucleus from the tent doors. And adjusted the nucleus settings to simulate a breezy wind which I think worked ok, see below.
Later on once the shot is established and animation done for the tent opening, I will build a series of cubes and shapes over but close to the apprentices mesh and make put them on a invisible layer and constrained to the relevent joints on the apprentice. They will all be made into passive colliders for the tent door nucleus so that when the apprentice emerges from the tent with these rigid bodies attached it will appear as though he is opening the tent door. If the ncloth passes through his body or is to far away because of the rigid body shapes at any point, the rigid bodies size will have to be adjusted accordingly so the cloth falls just over the geometry of the apprentices body. I will post this later once Im able to test it with roys animation to clarify.
The last video shows a quick test of what the mooring line would look like if we decided to have it as ncloth and on the same nucleus as the flag and the tent main canvas. The mooring line had to be transform constrained to the blimp at the top and at the bottom the anchor had to be made into a rigid body so the mooring line end loop would collide with it and not pass through it. The biggest challenge was getting the mooring line to move in the wind at a believeable speed for its size so the nucleus had to have its wind speed increased, which I thought would throw out the flag and tent canvas but fortunately it looked ok, See below.
If I had more time I would have animated the blimp moving about a little to give it some sence of being anchored like a airboat. The last thing I had to do was scale the mooring line down as simon wanted it a bit thinner, which was a little problem at first but I got there after a bit of fiddling and I ended up creating a mooring line without dynamics so simon had more options. Finally caching all the animation once all three elements where how I wanted them.
In the second video I seperated the flag and tents main canvas onto a seperate nucleus from the tent doors. And adjusted the nucleus settings to simulate a breezy wind which I think worked ok, see below.
Later on once the shot is established and animation done for the tent opening, I will build a series of cubes and shapes over but close to the apprentices mesh and make put them on a invisible layer and constrained to the relevent joints on the apprentice. They will all be made into passive colliders for the tent door nucleus so that when the apprentice emerges from the tent with these rigid bodies attached it will appear as though he is opening the tent door. If the ncloth passes through his body or is to far away because of the rigid body shapes at any point, the rigid bodies size will have to be adjusted accordingly so the cloth falls just over the geometry of the apprentices body. I will post this later once Im able to test it with roys animation to clarify.
The last video shows a quick test of what the mooring line would look like if we decided to have it as ncloth and on the same nucleus as the flag and the tent main canvas. The mooring line had to be transform constrained to the blimp at the top and at the bottom the anchor had to be made into a rigid body so the mooring line end loop would collide with it and not pass through it. The biggest challenge was getting the mooring line to move in the wind at a believeable speed for its size so the nucleus had to have its wind speed increased, which I thought would throw out the flag and tent canvas but fortunately it looked ok, See below.
If I had more time I would have animated the blimp moving about a little to give it some sence of being anchored like a airboat. The last thing I had to do was scale the mooring line down as simon wanted it a bit thinner, which was a little problem at first but I got there after a bit of fiddling and I ended up creating a mooring line without dynamics so simon had more options. Finally caching all the animation once all three elements where how I wanted them.
Monday, 14 February 2011
Rumble in the jungle: Totally Enormous Alive Plants.
Once all the major props were done I moved on to modelling the plants for this scene and the other scenes uv unwrapping as a went and passing the uv's over to Emma to texture. Below is a general build up of the scene, starting with the key plants and trees. One of the biggest mistakes I initially made was not instancing the plants when I duplicated them, but I later corrected this and saved a lot of time.
The best and funnest part about modelling the plants was that simon gave me free reign bar a 500 polygon count limit, which for a few plants had to be extended to 1000 polygons. On the most part they were below 300-400 polygons most of the time and with the use of alpha channels the shapes could be kept as planes to save further on poly count. If I had more time and more freedom with poly count I could have given some of the plants more thickness and definition, adding more detail to the trees and maybe even rigging all of them if time would allow which would have been nice to give a more organic feel to them. Below is a few breakdowns of some of the plants I modelled and uv unwrapped, which Emma in turn textured.

Lastly once the majority of the plants had been modelled, I layed them out throughout the scene. I also split the scene up into a proxy, props and plants set of layers to make things flow easier. Below shows the scenein smooth mesh, wireframed layers and textured. I also started to add simons plants that he modelled and textured into the scene to add more diversity.
Below lastly shows the majority of the campscene with textures, the various layers down the right hand side and the outliner all cleaned up. Due to time constraints I had to move on to the next scene and leave the rest of the texturing to simon the chief texture artist.
In the next blog post I will briefly cover the dynamics on the tent mesh, tent door, flag and mooring line.
The best and funnest part about modelling the plants was that simon gave me free reign bar a 500 polygon count limit, which for a few plants had to be extended to 1000 polygons. On the most part they were below 300-400 polygons most of the time and with the use of alpha channels the shapes could be kept as planes to save further on poly count. If I had more time and more freedom with poly count I could have given some of the plants more thickness and definition, adding more detail to the trees and maybe even rigging all of them if time would allow which would have been nice to give a more organic feel to them. Below is a few breakdowns of some of the plants I modelled and uv unwrapped, which Emma in turn textured.

Lastly once the majority of the plants had been modelled, I layed them out throughout the scene. I also split the scene up into a proxy, props and plants set of layers to make things flow easier. Below shows the scenein smooth mesh, wireframed layers and textured. I also started to add simons plants that he modelled and textured into the scene to add more diversity.
Below lastly shows the majority of the campscene with textures, the various layers down the right hand side and the outliner all cleaned up. Due to time constraints I had to move on to the next scene and leave the rest of the texturing to simon the chief texture artist.
In the next blog post I will briefly cover the dynamics on the tent mesh, tent door, flag and mooring line.
Thursday, 10 February 2011
Rumble in the jungle: Camp scene
Soon as I finished the Rigging of Bap I moved onto laying out the camp scene, starting with the major props.
I had no reference for the scene layout other than a pre made proxy of the scene see below.
Using the proxy scene that simon layed out, I used it to give me an idea of scale so I could start to build up the scene, adding in Props and editing existing props to fit into the environment as needed.
Above shows the initial build up of the scene in the first week. Adding props, uv unwrapping them and starting work on the tent canvas, door and flag dynamics that I thought would be essential to add life to the scene. As I modelled the props and uv unwrapped them I passed them over to Emma Taylor to texture as we went along. I then took the textures back into the scene and referenced them from dropbox to make life easier and to make sure they looked right in the scene. This worked quite nicely as a little production line and we knocked out the models and the textures quickly as a result. Below is a few props which I modelled and uv unwrapped and Emma textured.
Fig 1: stove
Fig 2: teapot
Above is a quick breakdown of the campfire area, which was modelled by me and some props textured by me and by Emma. I had also started to work on the fire flames but this will be explained and demonstrated further later.

The two images to the left are some examples of reference being used for modelling some of the props using a technique of lofting which over the course of this project iv found very useful for quickly modelling symetrical objects.
For connecting different elements of the model that have been lofted I used the fillet tools, which covered the seams nicely and made the piece look like one seamless piece of geometry. I have also started making much more use of Booleans for making holes like the ones on the stove see fig 1.
I also found that I was using the converting tools more to get easier to unwrap uv's. I found a lot of the time I was converting the nurbs modelled and lofted shapes into polygons and setting the poly count at an appropriate level, to maintain the original modelled shape while allowing for easy uv unwrapping and texturing.
I found using a lot of reference from many different types and styles of the object being modelled helped me to model the props more accurately and keep to a low polycount as requested while maintaining a appropriate level of detail.
Below are some more objects, modelled, uv unwrapped and textured all by me. These are the first few examples of me dabbling in texturing other than the major characters props such as the pocketwatch and the missile which will be shown later. Again keeping to a low polycount, while maintaining a medium level of detail as these would be in many shots.
One of the last props I modelled was the sleeping bag as I needed the complete finished geometry and rig of the apprentice to place the character in the pose he would be in while inside the sleeping bag. This was important for the closed sleeping bag shot with the apprentice inside. I wanted to make the top of the sleeping bag from ncloth so it would drape over the character in a more organic way than modelling it into position. Below shows the setup before turning it into ncloth.
Once I had turned the geometry of the top part of the sleeping bag into ncloth, I used the play back and a combination of fiddling with the nucleus settings to get the cloth to lay on the apprentice nicely. I also pinned the sides of the cloth to the bottom part of the sleeping bag to make the cloth fall more naturally.Once I got the cloth to lay on him nicely I set the initial state of the cloth, deleted the history, duplicated the geometry, which then allowed me to have the geometry position of the ncloth without the dynamics.
Below is quick overview and breakdown of the rigging of the second sleeping bag for when the apprentice opens the sleeping bag.It also shows the wireframe of the sleeping bag and the texturing i did on it. For the rig I just used a simple set driven key control with plenty of joints for the flap that opens and another simple control to translate the zip. When I made the sleeping bag I was very short on time due to the massive list of other things to do, so the modelling could have been better to help make the weight painting easier and thus better deformations. Other than that it was a fairly swift process, lastly I also split the rigging elements and geometry into layers and locked them so the animator can only select the controls.
In the next blog post I will cover some of the plants I modelled and more development of the camp scene.
I had no reference for the scene layout other than a pre made proxy of the scene see below.
Using the proxy scene that simon layed out, I used it to give me an idea of scale so I could start to build up the scene, adding in Props and editing existing props to fit into the environment as needed.
Above shows the initial build up of the scene in the first week. Adding props, uv unwrapping them and starting work on the tent canvas, door and flag dynamics that I thought would be essential to add life to the scene. As I modelled the props and uv unwrapped them I passed them over to Emma Taylor to texture as we went along. I then took the textures back into the scene and referenced them from dropbox to make life easier and to make sure they looked right in the scene. This worked quite nicely as a little production line and we knocked out the models and the textures quickly as a result. Below is a few props which I modelled and uv unwrapped and Emma textured.
Fig 1: stove
Fig 2: teapot
Above is a quick breakdown of the campfire area, which was modelled by me and some props textured by me and by Emma. I had also started to work on the fire flames but this will be explained and demonstrated further later.

The two images to the left are some examples of reference being used for modelling some of the props using a technique of lofting which over the course of this project iv found very useful for quickly modelling symetrical objects.
For connecting different elements of the model that have been lofted I used the fillet tools, which covered the seams nicely and made the piece look like one seamless piece of geometry. I have also started making much more use of Booleans for making holes like the ones on the stove see fig 1.
I also found that I was using the converting tools more to get easier to unwrap uv's. I found a lot of the time I was converting the nurbs modelled and lofted shapes into polygons and setting the poly count at an appropriate level, to maintain the original modelled shape while allowing for easy uv unwrapping and texturing.
I found using a lot of reference from many different types and styles of the object being modelled helped me to model the props more accurately and keep to a low polycount as requested while maintaining a appropriate level of detail.
Below are some more objects, modelled, uv unwrapped and textured all by me. These are the first few examples of me dabbling in texturing other than the major characters props such as the pocketwatch and the missile which will be shown later. Again keeping to a low polycount, while maintaining a medium level of detail as these would be in many shots.
One of the last props I modelled was the sleeping bag as I needed the complete finished geometry and rig of the apprentice to place the character in the pose he would be in while inside the sleeping bag. This was important for the closed sleeping bag shot with the apprentice inside. I wanted to make the top of the sleeping bag from ncloth so it would drape over the character in a more organic way than modelling it into position. Below shows the setup before turning it into ncloth.
Once I had turned the geometry of the top part of the sleeping bag into ncloth, I used the play back and a combination of fiddling with the nucleus settings to get the cloth to lay on the apprentice nicely. I also pinned the sides of the cloth to the bottom part of the sleeping bag to make the cloth fall more naturally.Once I got the cloth to lay on him nicely I set the initial state of the cloth, deleted the history, duplicated the geometry, which then allowed me to have the geometry position of the ncloth without the dynamics.
Below is quick overview and breakdown of the rigging of the second sleeping bag for when the apprentice opens the sleeping bag.It also shows the wireframe of the sleeping bag and the texturing i did on it. For the rig I just used a simple set driven key control with plenty of joints for the flap that opens and another simple control to translate the zip. When I made the sleeping bag I was very short on time due to the massive list of other things to do, so the modelling could have been better to help make the weight painting easier and thus better deformations. Other than that it was a fairly swift process, lastly I also split the rigging elements and geometry into layers and locked them so the animator can only select the controls.
In the next blog post I will cover some of the plants I modelled and more development of the camp scene.
Friday, 4 February 2011
4th Week Rainbow that bap.
At the start of this week my focus was to iron out the rest of the weighting issues. I spent a lot of time tweeking the areas of the stomach and the back hair joints as they had the biggest problem following the spine. I used extra stomach and back hair joints as was suggested to me by magic g which helped a lot to create better deformation. Also moving between replacing and smoothing tools to ease in a natural looking deformation were things that I used a lot. I thought it would be nice if there was hot key to colour pick the strength of your weights like there is for picking colours in photoshop, this would make life a lot easier when weightpainting as you would be able to animate through the different deformation poses and then keep editing the weight colours till the deformation looked correct. Below shows the second pass at weighting Baps body rig, an also the new eyelid controls, back legs (shoulder) controls and the sticky ik's on the arms.
The final tweaks for the geometry's UV-layout was sorted out this week and I had a clean up of the characters geometry layers. Here is a quick wire-frame turnaround (low quality pending better quality video) of the character standing tall at 12000 polygons. I probably could have widdled this back down to 8000 polygons if I had more time to optimise the areas where geometry was needed and wasn't needed to keep a nice low poly count. I think the next character I work on il try to get the polygons down to a game standard level as my poly count is something im trying to improve on keeping down while maintaining a decent level of detail.
The last thing I started to work on before being wisked back to environments modelling where I was needed was the eyes for Bap, I slapped a quick texture on to see how his eyes looked and weather the eye lids that me and simon had discussed would work with his character. We decided that for the time we had and how long things would take to make actual eyelids which had no design decided on, the simple geometry sweeping idea below would be our best bet and I think it turned out ok. With more time we could have made the eye lids more intergrated with the rest of the characters head, but luckily the texturing would be able to help out in this area.
The final tweaks for the geometry's UV-layout was sorted out this week and I had a clean up of the characters geometry layers. Here is a quick wire-frame turnaround (low quality pending better quality video) of the character standing tall at 12000 polygons. I probably could have widdled this back down to 8000 polygons if I had more time to optimise the areas where geometry was needed and wasn't needed to keep a nice low poly count. I think the next character I work on il try to get the polygons down to a game standard level as my poly count is something im trying to improve on keeping down while maintaining a decent level of detail.
The last thing I started to work on before being wisked back to environments modelling where I was needed was the eyes for Bap, I slapped a quick texture on to see how his eyes looked and weather the eye lids that me and simon had discussed would work with his character. We decided that for the time we had and how long things would take to make actual eyelids which had no design decided on, the simple geometry sweeping idea below would be our best bet and I think it turned out ok. With more time we could have made the eye lids more intergrated with the rest of the characters head, but luckily the texturing would be able to help out in this area.
Subscribe to:
Posts (Atom)


